


Introduction
Since 2016, Make An App Like has helped thousands of developers ship mobile apps faster by documenting clean, repeatable setups. We work with teams that use React Native in production, so this guide focuses on what actually works. Below is a simple, reliable way to run a React Native app on an Android emulator and on a real device, plus fixes for common issues so you can debug without guesswork.
How to run on Android device and emulator
Getting React Native to run smoothly comes down to having the right SDK tools, correct paths, and a connected target. Follow these steps in order, keep the app server running, and you will be able to test on both an emulator and a phone.
- Install prerequisites
- Node.js LTS, Java 17 (Temurin or Oracle), Android Studio with Android SDK Platform 34+, and Platform Tools.
- In Android Studio, install at least one system image (x86_64) and a device profile via Device Manager.
- Set environment variables: ANDROID_HOME to your SDK path, add platform-tools and tools/bin to PATH.
- Create or open your app
- npx react-native init MyApp or open an existing project.
- From project root keep Metro running: npx react-native start.
- Run on Android Emulator
- Launch an AVD from Android Studio’s Device Manager.
- In a new terminal: npx react-native run-android.
- Wait for Gradle build; the app installs and opens in the emulator.
- Run on a physical Android device
- Enable Developer Options on the phone, turn on USB debugging.
- Connect via USB. Verify with adb devices (device should show as “device” not “unauthorized”).
- Run: npx react-native run-android to build and install on the phone.
- Live reload and debugging
- With the app open, press M in emulator or shake the device to open the dev menu.
- Enable Fast Refresh. Use “Debug” to attach Chrome or React DevTools as needed.
- Common fixes
- SDK not found: confirm ANDROID_HOME and that buildToolsVersion and compileSdkVersion match installed SDKs.
- Device not listed: run adb kill-server && adb start-server, replug USB, accept the RSA prompt on the phone.
- Metro cannot connect: ensure both device/emulator and PC are on the same network; use adb reverse tcp:8081 tcp:8081 for USB devices.
- Gradle memory errors: in android/gradle.properties set org.gradle.jvmargs=-Xmx3g -Dfile.encoding=UTF-8.
- Release build signing: create keystore, add to android/app/build.gradle, and set signingConfigs for release.
Document Outline
- Run react native app on android emulator
- Running react native app on android device
- Connect Device via Wi-Fi
- Test your Reactnative app without android and emulator. (Most dependable)
In this article, we’ll show you how to run a react native app on an android device or emulator. If you already have the required drivers, updated emulator installed, the process is actually quite simple. If you don’t, don’t worry; we’ll walk you through the process of setting up your environment to execute react native run on android devices.
React Native is a cross-platform mobile development framework that allows you to create apps that look and feel native on both iOS and Android. You can choose to test your app on an emulator or an actual device with React Native.
The following are prerequisites in order to run a React Native app on Android:
- Android Studio
- JDK 8 (installation instructions for macOS here and Windows here)
- SDK Tools 26.1.1 or higher
- 64-bit processor
- Windows: CPU with UG (unrestricted guest) support
- HAXM 6.2.1 or later (HAXM 7.2.0 or later recommended)
What is an Android Emulator?
The Android Emulator simulates Android devices on your PC, allowing you to test your app on a variety of devices and API levels without having to android phone. [source]
- To install the Android Emulator, select the Android Emulator component in the SDK Tools tab of the SDK Manager. For instructions, see Update your tools using the SDK Manager.
An emulator is a computer program that allows you to test your app without having to buy a real device. The Android Virtual Device allows you to simulate a wide range of virtual devices. For example, you can use your favorite version of Android to set up an emulator based on a device such as the Google Pixel.
If you prefer to test your app on an actual Android device, React Native has you covered there as well. Connecting your Android device to the PC you use for development and issuing a command can be all it takes. Running React Native apps on Android, on the other hand, necessitates some preliminary setup.
Once you have downloaded the prerequisite, Download android studio and Run
Android Studio is the official IDE for developing Android apps. It is available for download for free from the official website. For macOS, Windows, and Linux, Android Studio is available.
To install Android Studio, go here and get the setup file. After that, run the program and follow the on-screen instructions to complete the installation.
Method 1
Install Android Studio to Run React Native on Android Emulator
Android Studio is the official IDE for developing Android apps. It is available for download for free from the official website. For macOS, Windows, and Linux, Android Studio is available.
Install Android Studio, and after that, run the program and follow the on-screen instructions to complete the installation.
Configuring Environment Variables For React Native Run Android Device
We have Android Studio and JDK 8 installed at this stage. As a result, we may add the Android SDK to our environment variables now. React Native will be able to interface with the Android SDK via the command line after this step.
Windows Setup to react native run on android
- Open the control panel (in category view)
- Navigate to Systems and Security → Systems.

3. Go to Advance System Setting as shown in the above picture.
4. Open the Systems Properties window from side menu
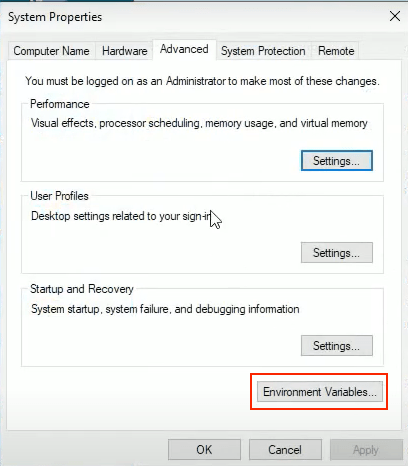
5. Hit Environment Variable from the popup window. Check the Attached image above
6. Input Value as shown in the below picture. In the first field, which is labeled variable name, add the following value: ANDROID_HOME.

7. In the variable value field. Need to input the path where Android SDK is installed on your system. You can confirm the path from system settings for Android Studio.

Open AVD Manager by navigating to Tools → AVD Manager in Android Studio. To launch AVD Manager from the welcome screen of Android Studio, navigate to Configuration → AVD Manage
Create a new emulator if yet to setup.

Click on the “Create Virtual Device” from the bottom of the AVD screen

Method 2
How to Run React Native App On Physical Android Device
Now we’ll run our project on an actual Android device. Let’s make sure the device and your PC can interact correctly before we proceed.
It’s always a good idea to test your React Native app on a real android phone if you’ve finished the development part. It is because emulators often behave differently than real devices.
Steps to Running React Native App on Android Device
- Unlock your android device, Go to Settings>About Phone
- Find for the Build number or UI version and click it multiple time, In the About Device section, tap on the Build Number 10 times or until you see the message “You are now a developer.”
- After that Enable Developer Option and USB debugging
- Once it done, attach your android phone and perfrom below mentioned commands.
Attach your Android phone with the computer using a USB cable and run the following command on the terminal.
1. adb devices
2. npx react-native run-android  or react-native run-android

If you get a “bridge configuration isn’t available” error. Then use below command to solve

Here you have to replace <device name> with your device name.

3. adb -s <device name> tcp:8081 tcp:8081

Now re-run the app using

4. react-native run-android

Forward requests from your device (Optional)

5. $ adb reverse tcp:8081 tcp:8081

If you're on a physical device connected to the same machine,

6. run 'adb reverse tcp:8081 tcp:8081' to forward requests from your device

If you've upgraded your version of react-native since generating your android project files, you might want to regenerate those now. I think you can use

7. react-native upgrade.
If you have followed all the steps mentioned above correctly, the react native app will run on android phones successfully. But it could take a few seconds or minutes depending upon the environment.
Method 3
You can also use Wi-Fi to connect react native app to the development server. You’ll need to use a USB cord to install the programme on your smartphone, but after that’s done, you may debug wirelessly by following these instructions. Before you begin, you’ll need the current IP address of your development machine.
Open a terminal and type /sbin/ifconfig to find your machine’s IP address.
- Make sure your system and your android phone are on the same Wi-Fi network.
- Open your React Native app on your device.
- You’ll see a red screen with an error.
- No worries, This is OK.
- Open the in-app Developer menu.
- Go to Dev Settings → Debug server host & port for device.
- Type in your machine’s IP address and the port of the local dev server (e.g. 10.0.1.1:8081).
- Go back to the Developer menu and select Reload JS.
Method 4
Test Your React Native Without Android Device and Without Emulator
Let’s look at another method to test run a React Native app, in addition to the approaches we’ve examined so far. Waldo is a mobile development testing solution that doesn’t require any coding. It’s simple to use and doesn’t require any lengthy configurations.
Waldo is available to try for free. To join, go to their website and fill out the form. After that, you can use Waldo to effortlessly test your React Native app.
Push Your React Native App to Playstore
You have built a great app using React Native, and you are now itching to release it in the Play Store. The process is the same as any other native Android app, with some additional considerations to take into account.
If Android Studio, SDK paths, and adb are in place, React Native runs with two commands: start Metro and run-android. Use an emulator for quick UI checks and a real device for performance and hardware testing. Keep an eye on environment variables, SDK versions, and adb connectivity, and you will have a stable Android workflow for daily development.


 20 Best Blockchain Business App Ideas, Opportunities With Examples to Capitalize